This post contains affiliate links. That means that if you click on a link and/or purchase something you love from the list below, I may receive a commission because of that sale. It won’t cost you anything extra, but it will help me keep Kate Decorates up and running. Thanks for your support! To read my full disclosure policy, please click here.
After several months of mulling over all the details of this project, our basement TV and kids playroom makeover is finally finished! I’ll be over here breathing a sigh of a relief and sipping some sangria. Yep, that’s how we roll post-makeover over here at my house. (Also, this is different than our main-level kids playroom)
I’m so thrilled that our basement is now a fun, welcoming space that serves multiple purposes for kids and adults alike.
Why Our Basement Room Needed a Makeover
If you’ve been following the blog for a while, you may recall that I initially got the idea to give the basement a face lift around Christmas time. Santa was bringing the kiddos an adorable striped teepee, and that impending (and stylish!) gift was what got the ball rolling on our makeover.
Yes, I am totally that person who feels that a single Christmas gift warrants an entire room makeover. (Hey, I love any excuse to re-decorate….)
This space was a blank slate with so much potential:
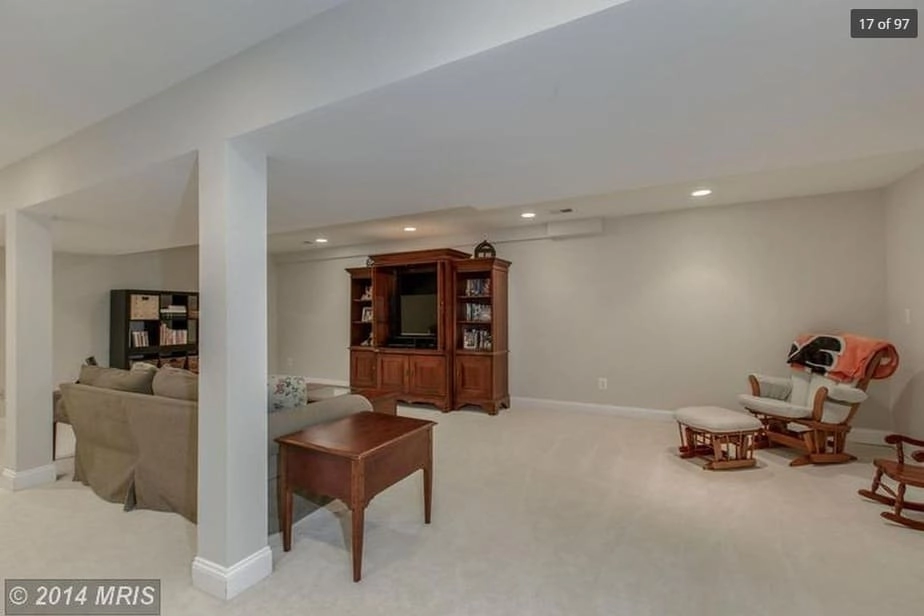
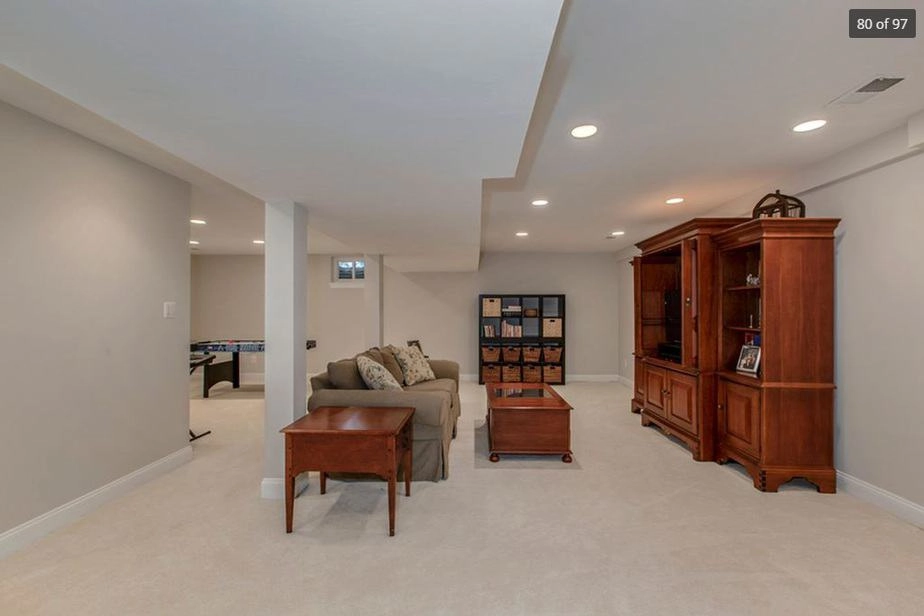
But after we moved in we somehow let it turn into a storage unit of sorts that housed all the furniture, toys, and other odds and ends that didn’t have a designated spot in our home. Because we largely ignored our basement, it turned into a place that I didn’t want to spend any time in, and for that reason, I largely avoided going down there with the exception of doing a load or two of laundry.
My Approach to our Basement TV Room Makeover
I knew that if I wanted to turn the basement into a space I actually loved, it would require both time and money. This wasn’t just a “let’s add a couple accessories and we’ll be done” kind of project. It was more like, “Let’s budget out all the new paint, furniture and decor we need so that this place doesn’t look so boring and can stop being a source of embarrassment when we have guests over.”
So using our soon-to-be new teepee as a cornerstone of the design, I pulled together a few ideas that also incorporated some of the larger furniture pieces that needed to stay in the space, like our amazingly comfortable sofa. I explored a new paint color for the walls, but we decided to keep the carpet as is for now. I don’t love it by any means, but it’s in fine shape and swapping this out for dark hardwoods or laminate flooring isn’t at the top of the priority list.
As the kids get older and we don’t need a playroom like this anymore, then we’ll probably give this space yet another makeover. My husband and I have talked about adding a built-in bar, some theater-style seating, and other fun, more adult-ish elements. Check back in 10 years and maybe I’ll be writing another basement update post!
What I Changed in Our Basement TV Room
Quite a bit. With the exception of the teepee, our sofa, and the carpet that was here when we moved in, everything else in the space got a kid-friendly refresh.
We divided the room into two main spaces: a lounge/TV-watching area, and then a large play space for the kids.
Our basement is where we keep our moon bounce, small trampoline, gymnastics mat, slide, and other large-scale play items that encourage running and jumping, so our goal was to leave a fair amount of space for the kids to be active in this area. Yes, sometimes our basement feels like a full-fledged amusement park.
This stuff is such a lifesaver for us on cold, rainy and snowy days, though. The indoor inflatable moon bounce we purchased a few years ago — which is similar to this one — has paid for itself time and time again, and has been such a great way for the kids to burn some energy when they can’t go outside!
This also meant that I had to be smart about wall decor and the surrounding furniture in the play area…..meaning breakable items were off limits, and picture frames needed to be used sparingly. More on that in just a minute.
Ideas for the Future
Like I mentioned, this is a temporary fix until the kids get older and my husband and I can turn this into a more adult space with a bar and theater area. Hey, it’s good to have long-term goals, right?
At some point, I would love to rip out the carpet and swap it for dark hardwoods or laminate, but it’s not worth the expense at this point in our life.
I also considered adding a rug in the play space as I was working on the room — I had my eye on this colorful rug that still makes my heart skip a beat. I think it would look amazing, but the reality is that because we do a lot of running and moving around down here, having a large rug just isn’t practical for us at this time. So the realist in me won out over the designer, and I decided to skip the rug in that part of our basement.
Basement TV Room and Basement Kids Playroom Reveal
All right, here’s where we landed with our basement TV room makeover. Ready?
When you come downstairs and round the corner, the TV/lounge area is the first space you see:

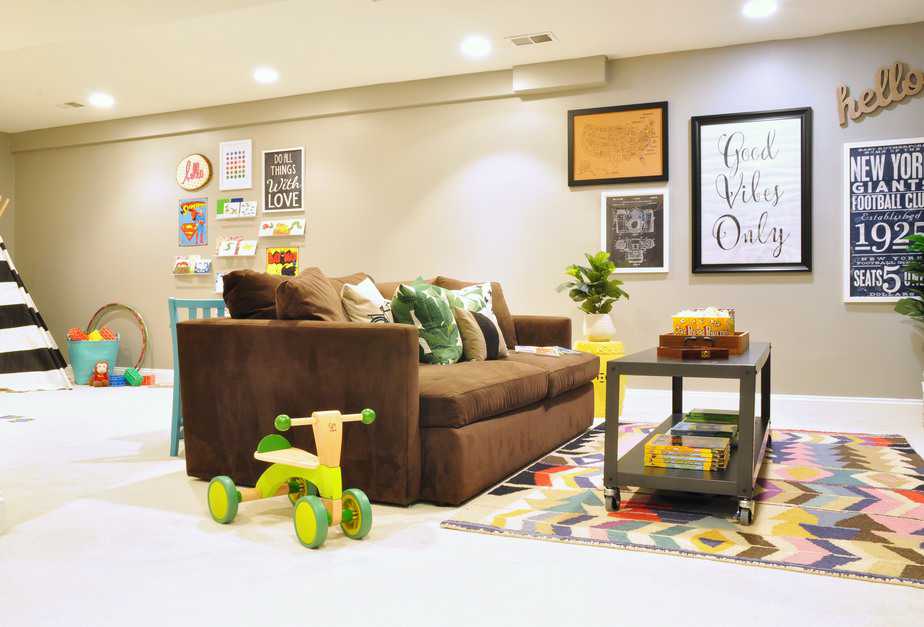
We’ve owned our super comfy sofa for several years, but that’s the only “old” item that stayed in the room. Everything else is new. I’m obsessed with this colorful, boho-esque rug that I found for about $100 (three cheers for coupons), as well as our fun tropical palm leaf pillows from Etsy.

The metal coffee table from CB2 that I scored via Craigslist is perfect for entertaining and holding everything from board games to bowls of snacks. And instead of adding typical coffee table books to this area, I borrowed an idea from my friend Angela and Blue i Style and stacked plenty of kid-friendly coffee table books here. Both my kids, ages 5 and 1, are obsessed with this line of books produced by National Geographic. We’re on our way to collecting all of them and might as well be this book series’ unofficial brand ambassadors.
We rounded out the space with some wall art that reflects our family. My husband is a photographer and a huge New York Giants fan, and we use that cute cork board map featured in the previous photo to track our family’s travels. My daughter loves placing the pins on our vacation spots and talking about all the places she wants to visit someday.

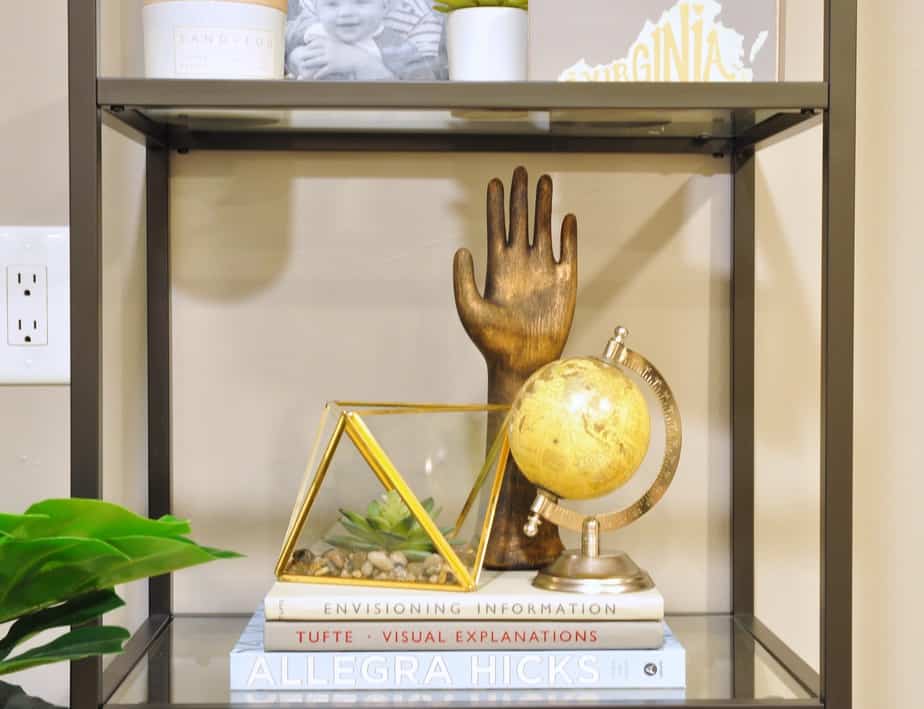
Most of the decorative items on our IKEA shelves were HomeGoods finds, although we did own a few of the books beforehand.
Side note about those IKEA shelves: If you have these in your home or are planning on purchasing them, make sure you bolt them to the wall to keep them secure. My husband was really nervous about having glass and metal shelves in our basement at first with the kids spending so much time down here, but he breathed a sigh of relief once he discovered that the hardware needed to secure these was included in the box with the shelves.
Also, I keep resisting the urge to run up and give this bronzed hand a high five. Seriously.
Okay, ready to see the kids’ basement playroom area?
Let’s do it!
That teepee is definitely a favorite hiding spot for the kiddos. Now let’s talk about the rest of the space.

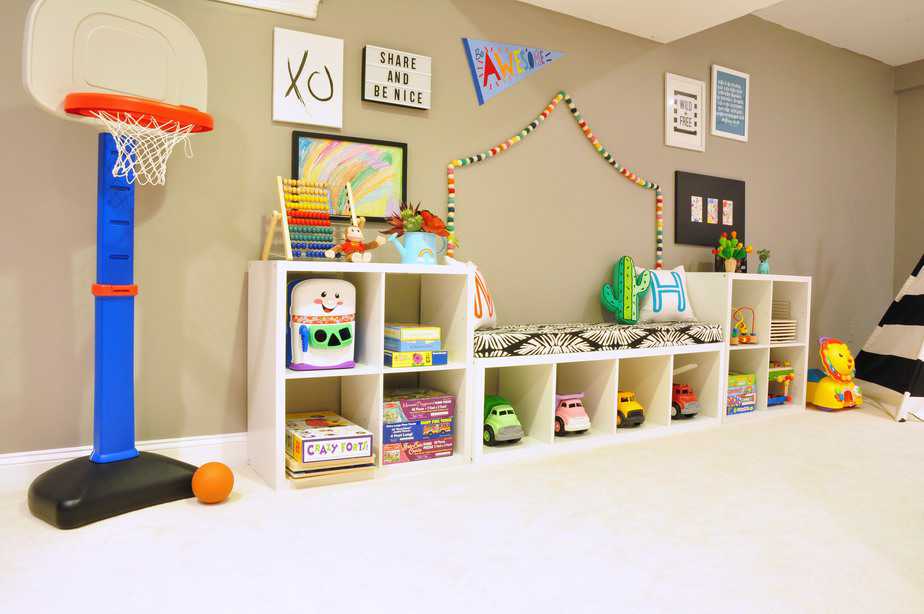
Our IKEA Kallax shelf-turned-bench was a past DIY project, which you can read about how I created an IKEA Kallax cushion for the bench.
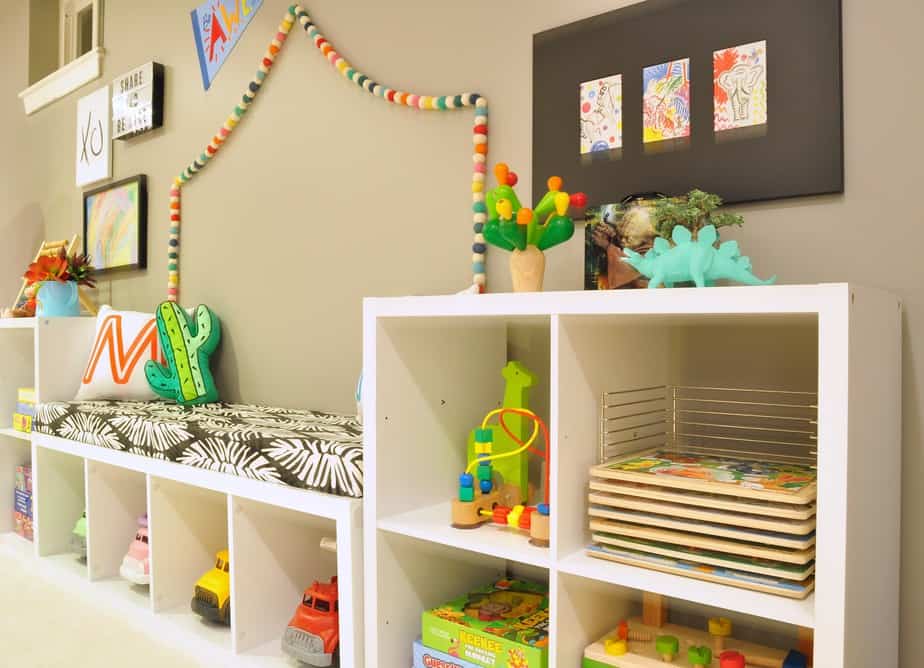
That new bench and shelving area is a perfect anchor for the space, and it’s the main area in the basement where we house our toys. I jazzed it up with some adorable monogram pillows and that cute cactus pillow, plus some fun felt garland in rainbow hues.
As for the wall art, I loved incorporating one of my daughter’s drawings. She loves all things rainbow, so her artwork above the shelf on the left was a perfect addition to this room!
Then I added a light box, a few more art prints, plus some animal postcards that I stuck in an old frame and turned into art (cheapest art project ever).
Here are a few more shots of the kids teepee, along with our fun wall of flashcards.

Remember how I said we couldn’t really have many breakable items in the basement? Well, that applies to artwork too.
So instead of putting a bunch of glass frames on the wall, I found some vintage superhero prints at a nearby antique store, and hung these clear acrylic shelves on the wall to display flashcards, books, or whatever else we want. Right now they’re holding our Pantone flash cards and a few Eric Carle illustrations.
The nicest part about this is that the acrylic shelves allow us to switch up our wall decor at any time. I love solutions that are both practical (no sharp edges here!) and versatile.
And how cute is that wood slice “hello” sign?! I found it on Etsy, and it was made by my friend Cara from Coloring Home Design (who has a fun and colorful Insta feed, by the way).

And let’s not forget about our awesome trampoline (a family favorite) or the gorgeous aqua table and chairs set, which is perfect for everything from coloring to snacking.

Here’s a close-up of our monogram and cactus pillows that sit on our IKEA Kallax-turned-bench. Speaking of cacti, how cute is that stacking cactus toy on the right?! I initially bought it because I thought it would be a fun piece of kids’ decor to have, but it turns out that it’s actually a cool balancing game that my daughter enjoys.
In this photo, you can also see a better shot of the postcards that I framed. Aren’t they so fun and colorful?!

One more shot of our bench! I have to tell you that one of the best purchases I made for the playroom from an organizational perspective is that wire puzzle rack on the right. If you own every Melissa & Doug puzzle known to man like we do, then you need this. That puzzle holder is seriously a genius way of keeping them all organized.
All right, one final pic for you! I know it’s blurry (my bad — do you know how hard it is to shoot a room that gets zero natural light at, um, 10 p.m.?) but I wanted to show you this chalkboard wall I created for the kiddos.
I was initially worried about putting a chalkboard wall in our basement because I assumed the dust from the chalk would destroy our carpet and drive me bonkers.
Well, I discovered dustless chalk (AND I am pleased to report that it actually is dustless, because we’ve tested it many times), so I went ahead and painted the chalkboard wall for the kids. They love it!
The two-toned wood wall letters were a quick DIY project, and I wrote the kids’ names on the wall using a white chalkboard marker that writes more like a paint pen.

You may have noticed that the space to the right looks like it’s untouched. That’s our moon bounce / basketball / gymnastics mat area, so I purposely didn’t add any decor in that spot. There was a part of me that wanted so badly to decorate that area, but sometimes practicality wins out. Sometimes.
So there you have it! It’s so nice to now have an open and inviting space in our home that both kids and adults can enjoy.
If you made it all the way to the end of this post — THANK YOU so much for reading!


Destini Hill
Thursday 21st of December 2017
Would you please share the paint color you used on the walls?? Thanks!
Kate
Thursday 21st of December 2017
Hi Destini, sure thing! I used Valspar's Rocky Bluffs on the basement walls.
Valerie | One Happy Housewife
Tuesday 20th of June 2017
I absolutely love this!! The colors are awesome and it's such a functional space! Makes me wish we had basements in Texas!! As usual, well done Kate!!
Kate
Tuesday 20th of June 2017
Thank you so much, Val! We're definitely enjoying our new space so far. :)
Bethany Crisp
Tuesday 20th of June 2017
What an AMAZING transformation! Love what you did with this space and I'm sure your littles adore it too! Great job!!
Kate
Tuesday 20th of June 2017
Thank you so much for the sweet comments, Bethany!