This post contains affiliate links. For my full disclosure policy, click here. Thanks for your support!
We’ve been using our IKEA Kallax shelving unit as a bench for a few years now. It first held toy bins in our main level playroom (we have these and these, which I LOVE because they fit seamlessly into the rest of our decor), and then we moved it to the basement where it now plays a similar role.
When I decided to turn it on its side, and I figured I’d make it into a bench to add some extra seating for the kids or adults, which is especially useful when we’re hangin out in our basement.
Well, I consulted my dear friend Google in an attempt to find a sturdy, Kallax-sized cushion, and guess what?
Oh yes, there are some available on Etsy…..and most of them cost anywhere between $150 to $200.
I’m sorry. What?!
That seemed outrageous to me. I decided there had to be an easy way for me to make one for a fraction of the cost.
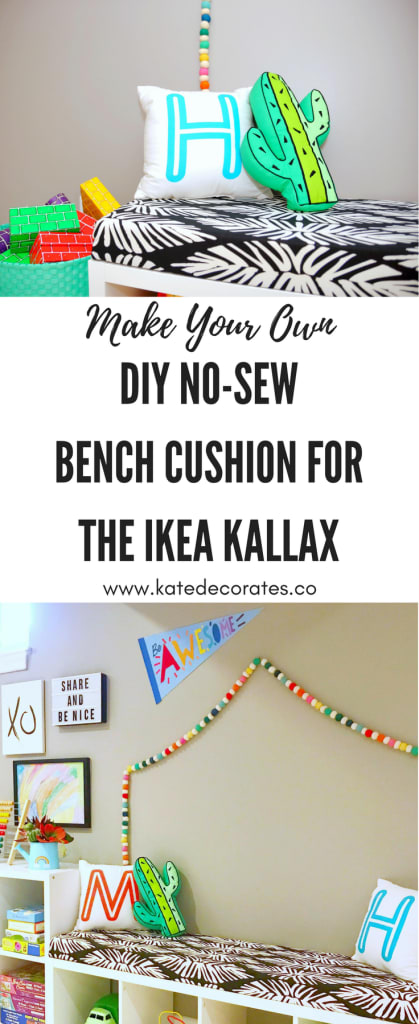
And I’m excited to tell you that I did make my own bench cushion with this DIY IKEA Kallax hack, and it was so, so simple. My version cost me about $50, a trip to the fabric and hardware stores, and about 30 minutes of time.
Much better than the alternative, right?! The best part is that there was no sewing required!
I can barely sew a button on a shirt, you guys, so this was excellent news. So if you’re sitting there going, “Wellllllll, I can’t sew and am kinda nervous about this project…..” I’m going to tell you right now that you need to quiet that voice inside your head, get yourself to your local hardware store (or shop everything you need using the links below!), and make one awesome cushion.
Where to Buy an IKEA Kallax Bench
Technically this is a shelving unit that stands upright. But me, like many others, realize it makes a great bench when laid down on it’s side. You can buy them in a few places:
- ikea.com is the obvious first choice
- Did you know Amazon sells them too? Yup, right here
- You can also find them on Facebook Marketplace and other local online marketplaces
Yes, the IKEA items offered on Amazon are a bit more expensive than they would be if you drove to the store, but frankly sometimes the convenience factor gets me and I’m happy to pay a little extra so that I don’t have to fight traffic and crowds during a weekend trip to IKEA.
TIP: Even if you don’t have an IKEA Kallax, you can still complete this project with any similar shelving unit. For example, Better Homes and Gardens makes a great line of similar-looking shelving, as does Target (check out some options here).
Make sure to check out these other related posts I think you’ll enjoy:
- 7 stylish and easy IKEA hacks that are perfect for kids’ playrooms or bedrooms
- This IKEA Henriksdal chair hack makes your budget-friendly dining chairs look custom
- 5 things you must know if you’re considering an IKEA kitchen remodel
Supplies for your DIY IKEA Kallax Bench Cushion
Ready? Here’s what you’ll need for this Ikea Kallax hack project. For your convenience, I’ve linked to most of the materials that I used so that you don’t have to go hunt them down yourself.
You could go to your local hardware store and buy all this stuff, but I am all about avoiding extra errands whenever possible and prefer to do nearly all my shopping online!
DIY Kallax cushion shopping list:
- One piece of MDF board, cut to the size of your Kallax (in our case, I purchased one board, cut it, and then glued the pieces together so that the board was the appropriate size and then reinforced that with duct tape)
- One piece of 3″ multi-purpose foam
- Fabric scissors
- A serrated kitchen knife (I know this sounds odd, but stay with me here)
- A heavy duty staple gun
- About 3 yards of good quality fabric of your choice (This is one of my favorite online fabric shops, as well as this shop that I bet you had no idea carried fabric. Just promise me you won’t buy the cheap stuff just because it’s a good deal. You’ll be disappointed with your finished product, and I don’t want that to happen to you!)
How to Make a DIY IKEA Kallax Bench Cushion
Instructions for the Kallax bench cushion…..
- Before heading to the hardware store, measure your Kallax bench. This will ensure that you select the right size MDF board for this project.
- Once you’re home, cut your MDF board to size. My husband did this for me, but I highly recommend you ask the lovely folks at your local hardware store to do this for you. Sadly, the cutting machine at my local Home Depot wasn’t working the day I purchased my MDF board, so we took care of this at home.
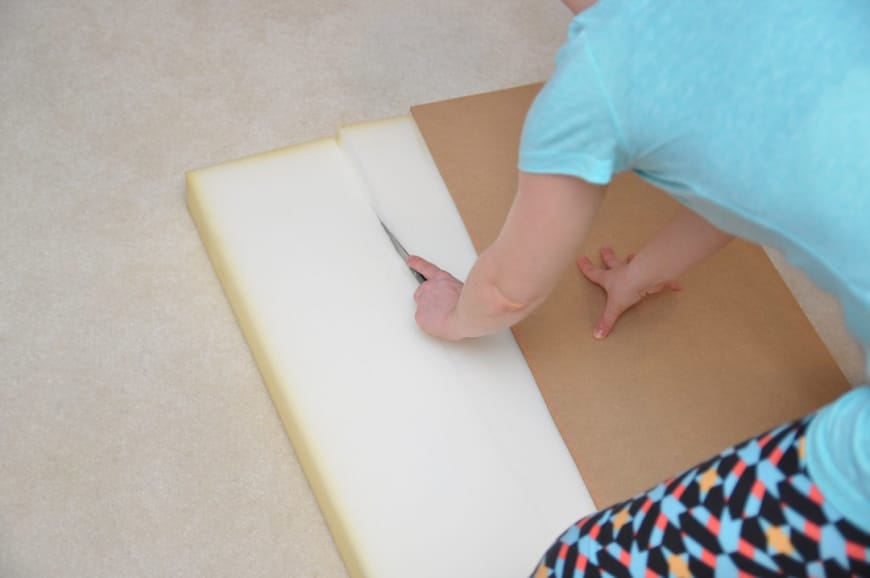
- Place your foam on the floor, and put your cut MDF board over it, lining up the corners of the foam and MDF board.

- Cut your foam to size using a serrated kitchen knife. (Yes, it works quite well!) Don’t worry if you have some jagged edges. You won’t be able to see those after you cover the foam and MDF board with fabric.
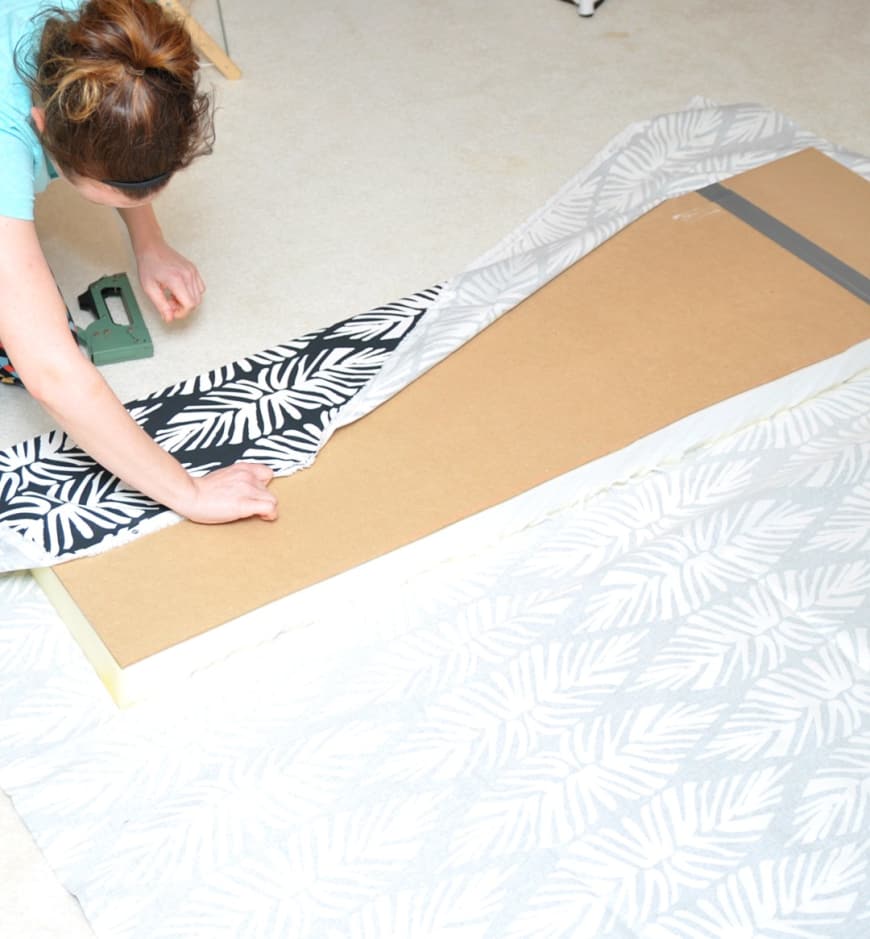
- Place your fabric face down on the floor. Then set your foam on top of that, and place the MDF board on top of the foam. If you’re using a patterned fabric, make sure your fabric is placed accordingly. You’ll be folding the fabric over the edges of the foam and MDF board, so go ahead and trim any excess fabric if needed.
- Pull your fabric and begin stapling it to the MDF board. (Hint: If you have a partner or friend nearby, have them help you with this step. It’s nice to have a second set of hands as you’re pulling and stretching your fabric!) You want to make sure you pull the fabric tightly so that the foam nor the MDF board shift underneath.
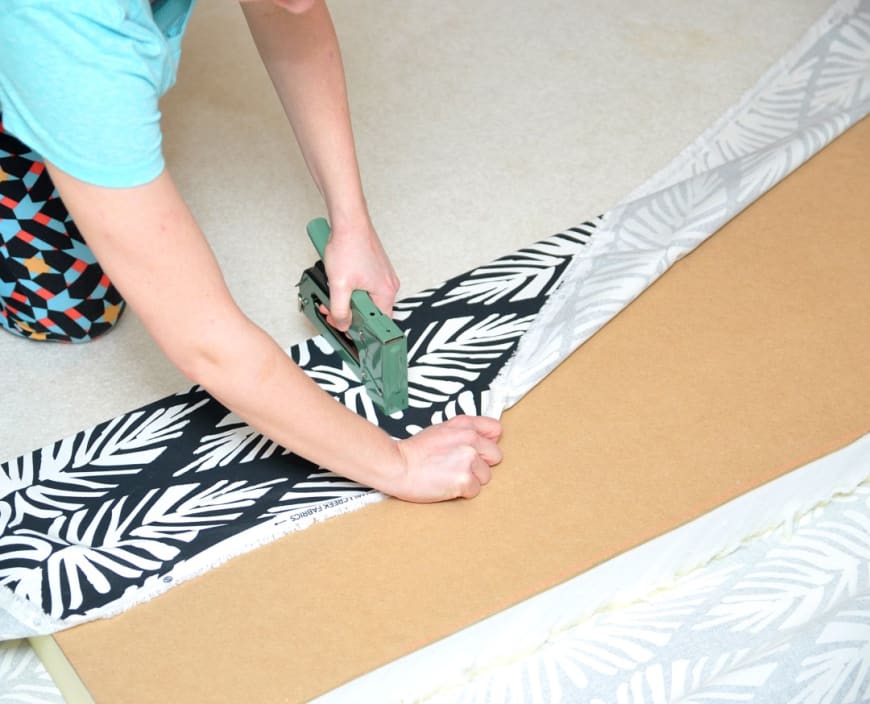
- Pull your fabric over one of the two longer sides of your cushion, and staple that to the MDF board. Do the same on the other side. Then staple the ends, leaving space around your corners. (You’ll tackle those last.)
- For the corners, I recommend watching the first 30 seconds of this video so that you can see exactly how to tuck and then staple the fabric in each corner. It’s much easier to understand the technique used by watching this video versus trying to read a laundry list of directions.

That’s it — you’re done! Easy, right?
Our finished IKEA Kallax bench cushion:

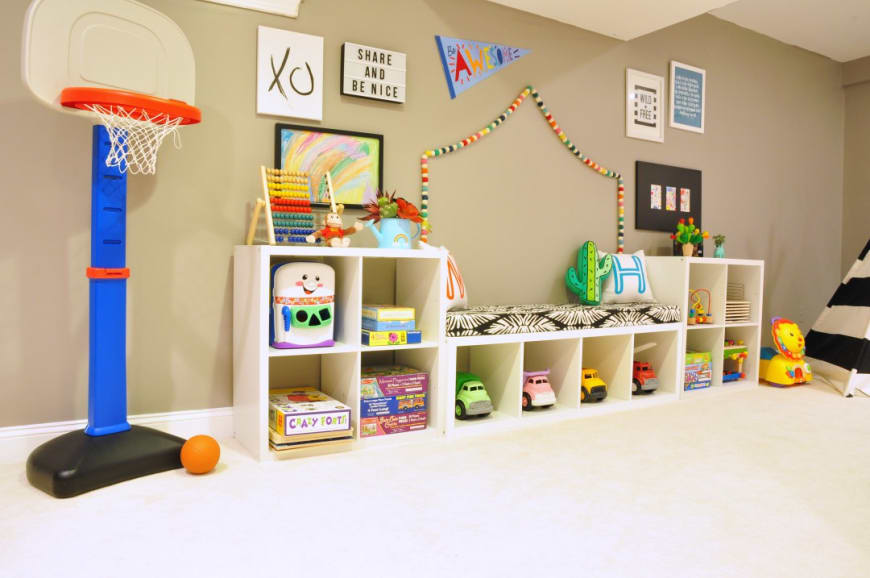
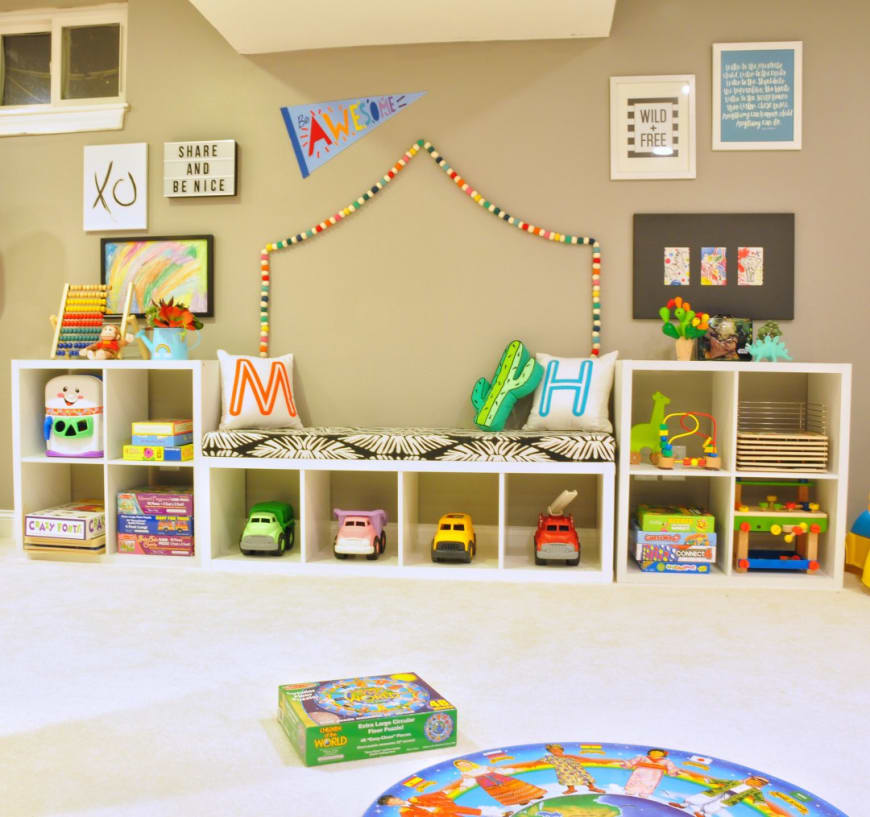
If you’re wondering how I attached the cushion to the shelving unit, I used large 3M Command Strips to attach my bench cushion to the Kallax. (I love Command Strips and use them for just about everything. Seriously, aren’t those things totally genius?!)
There you go! I love DIY projects that don’t require any sewing, are quick to complete, and are inexpensive — and this Ikea Kallax hack definitely checks all those boxes.
P.S. Like something you see above and wanna snag it for your own playroom? Check out my handy shopping guide below!
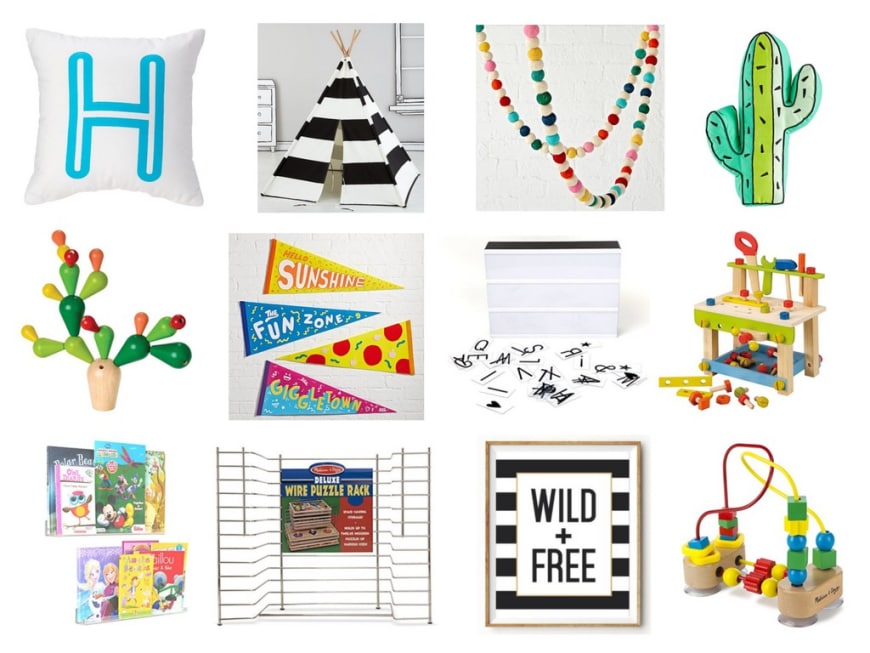
Neon monogram pillow (multiple letters available) // Striped play teepee // Rainbow felt garland // Cactus pillow
Cactus stacking toy // Wall pennants (similar to what I purchased) // Lightbox // Wooden tool bench
Acrylic wall shelves, set of two // Melissa & Doug wire puzzle rack // “Wild + free” wall art // Melissa & Doug bead maze

Maria
Friday 30th of October 2020
Hi! I’m doing this project and wondering how much fabric I should leave for the corners? Thank you!
Kate
Saturday 31st of October 2020
Hi Maria, I left about a foot of fabric on each side, and then I trimmed the excess after stapling the fabric to the particleboard. hope that helps.
Emily Henders
Monday 20th of July 2020
I can’t find the 3” cushion... where did you get it from? How much did you pay for it?
Kate
Monday 20th of July 2020
Hi Emily! I found it at Home Depot. I don't recall the price of it.
Lydia
Tuesday 21st of April 2020
Love this!! Thank you so much for sharing. Do you have a link or name for this specific fabric?
Kate
Wednesday 22nd of April 2020
Hi Lydia, I'm so glad you liked the project! I can't recall the name of this particular fabric but I bought it at the JOANN store near me (although this was 3 years ago). Sorry that I don't have more info for you!
Charlotte Cornell
Friday 30th of August 2019
Really lovely. What are you using in the photo to decorate the house shape above the seat area?
Kate
Friday 30th of August 2019
Thanks, Charlotte! That's a strand of multicolored pom pom garland that I hung on the wall.
Sarah
Thursday 1st of August 2019
I am confused on the part where you say to glue and to duck tape but I don’t see that in the steps?
Kate
Friday 9th of August 2019
Hi Sarah -- If you buy a piece of MDF board that's larger than the surface of the Kallax, then you shouldn't have to glue or duct tape anything. Unfortunately my local hardware store didn't have an MDF board that was long enough, so we retrofitted our own (which is why you see the duct tape).