My two kids are obsessed with arts and crafts. And I do mean obsessed.
Not like, “Oh hey, we pick up some crayons once in a while and like the occasional coloring book.” No, no. Not even close. I’m talking like, “We’ve got a full-on giant museum of masterpieces over here and are about to put an addition on our house to store all this artwork.” From doodling on pages of a coloring book to bringing home glitter-laden masterpieces from school, I don’t think these two have ever met a craft they didn’t like.
And while this makes me oh-so-happy — I really do mean that because I’d much rather they be doing art and getting creative versus spending hours in front of the TV — it also means we are drowning in tissue paper flowers and color-by-number creations and drawings of rainbows and unicorns.
My poor fridge cannot handle it anymore.
If you have a fridge that’s in the same boat, then keep reading.
This super easy DIY project for displaying kids’ artwork at home is stylish, inexpensive and most importantly — effective.
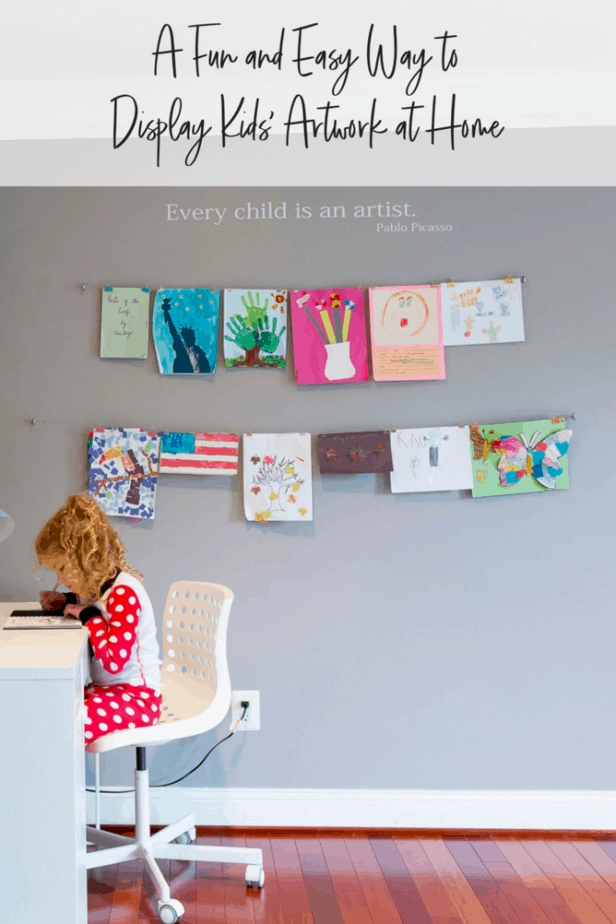
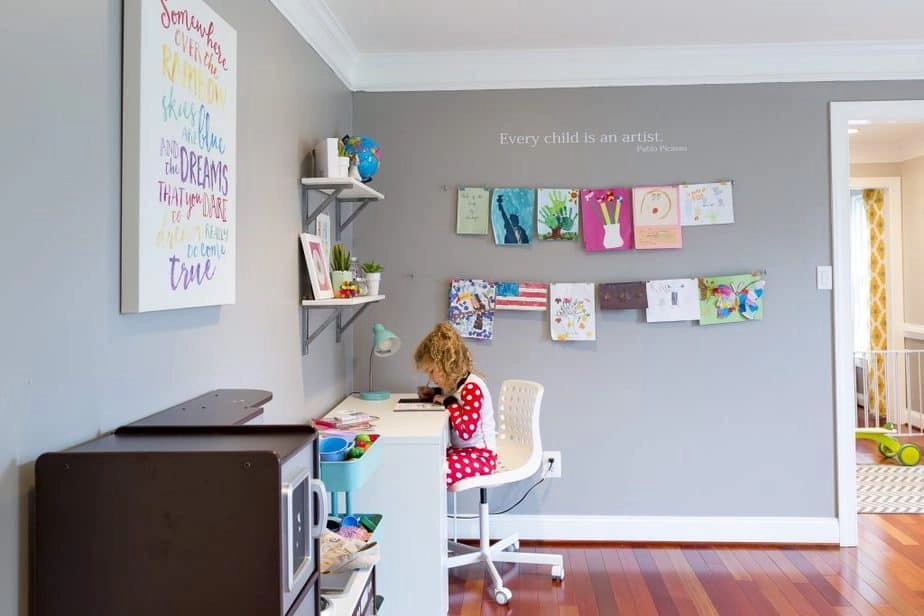
Last year, I finally decided we needed a new way to display the kids’ artwork. I had no more space on our fridge, and my kids wanted to see their favorite creations front and center, yet I had nowhere to put them.
So like most of us, I consulted my buddies Google and Pinterest. But most of the ideas I came across involved a cork board (too expected) or frames (too hard to swap stuff in and out on a regular basis), and others seemed like they were going to take far too much of my weekend morning to execute.
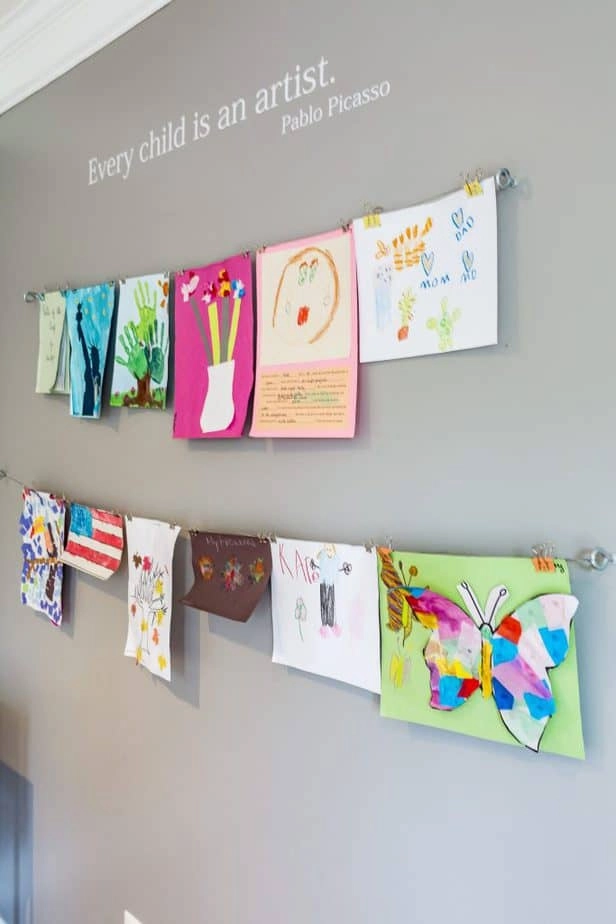
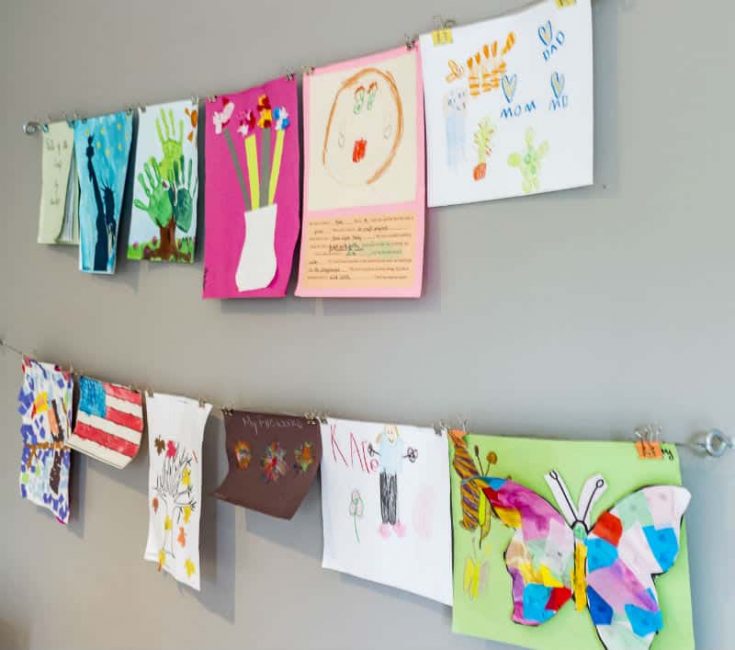
Well, I ditched Google and Pinterest and came up with my own plan. Here’s our finished art gallery, which lives in our kids playroom:
Now here is the incredibly easy list of items you’ll need for this project, plus the simple instructions. For your convenience, I linked to most of the materials I used, all of which are available on Amazon.
Sure, you could go to the hardware or craft store and buy similar supplies, but I am all about avoiding extra errands whenever possible, and love to take advantage of free two-day shipping thanks to my Amazon Prime Membership!
- Related: A simple, Small Space Homework Station
- Related: My Simple Secret for Keeping Crayons and Markers Organized
- Related: How to Organize Art Supplies for Kids Playrooms (Plus the Easiest IKEA Hack Ever)
This post contains affiliate links. For my full disclosure policy, click here. Thank you for your support!
Supplies You Need for a DIY Kids Artwork Wall
WHAT YOU’LL NEED TO MAKE YOUR OWN WALL DISPLAY FOR KIDS’ ARTWORK
- Metal eye hooks (I like this assortment from Amazon, which gave me so many options to choose from when configuring my display)
- Picture hanging wire
- Binder clips (any color will do, but I got this fun pack from Amazon)
- Scissors that are sharp enough to cut the wire
- Multipurpose level, preferably with a laser (this is the one I have and it comes in handy ALL the time)
- Vinyl wall decal (optional, but I love the one I got from Etsy and I think it makes the gallery look polished)
- Pencil for marking the walls
How to Display Kids Artwork at Home
WHAT YOU’LL DO: HOW TO MAKE YOUR OWN WALL DISPLAY FOR KIDS’ ARTWORK
- Decide where you want to hang the gallery.
- Using your pencil and a level, place two pencil marks on your wall where you’ll screw in the eye hooks.
- Screw in the eye hooks (this can be done by hand — no tools needed).
- Once your eye hooks are secure, cut your picture hanging wire to the appropriate length, leaving about 6 extra inches on each side.
- Secure the picture hanging wire around one eye hook. Make sure to wrap it around the eye hook several times so that it is secure.
- Make sure your wire is as taut as possible and pull it over to the other eye hook. Repeat the previous step.
- Trim any extra wire from either end.
- Step back and admire your handy work!
The best part about this project is that you can customize your wall display however you’d like so that it works for you. Need more display space? Add another row of wire or use more than one wall. You can customize it with a fun vinyl wall decal from Etsy like the one we have, or skip it. It’s up to you!
What are some other ways that you like to display the masterpieces made by your kiddos? Leave me a comment below.
How to Display Kids’ Artwork at Home
If your kids are obsessed with arts and crafts and want to show off their work, here's a simple DIY to display kids artwork in your home, with just a few supplies.
Materials
- Metal eye hooks
- Picture hanging wire
- Binder clips
- Scissors or wire cutters
- Multipurpose level, preferably with a laser
- Vinyl wall decal (optional)
- Pencil
Instructions
- Decide where you want to hang the gallery.
- Using your pencil and a level, place two pencil marks on your wall where you’ll screw in the eye hooks.
- Screw in the eye hooks (this can be done by hand — no tools needed).
- Once your eye hooks are secure, cut your picture hanging wire to the appropriate length, leaving about 6 extra inches on each side.
- Secure the picture hanging wire around one eye hook. Make sure to wrap it around the eye hook several times so that it is secure.
- Make sure your wire is as taut as possible and pull it over to the other eye hook. Repeat the previous step.
- Trim any extra wire from either end.
- Step back and admire your handy work!